Hay’s Bridge: A Method for Measuring Self-Inductance


Hay’s bridge is a type of AC bridge circuit that is used to measure the self-inductance of a coil with a high-quality factor (Q > 10). It is a modified version of Maxwell’s bridge, which is suitable for measuring coils with a medium quality factor (1 < Q < 10). In this article, we will explain the construction, theory, phasor diagram, advantages, and disadvantages of Hay’s bridge.
What is Self-Inductance?
Self-inductance is defined as the property of a coil or circuit that causes it to oppose any change in the current flowing through it. It is measured in henries (H) and depends on the number of turns, the area and the shape of the coil, and the permeability of the core material. Self-inductance produces a self-induced electromotive force (emf) that opposes the change in current according to Lenz’s law.
What is Quality Factor?
The quality factor is a dimensionless parameter that indicates how well a coil or circuit resonates at a given frequency. It is also known as the Q factor or figure of merit. It is calculated by dividing the reactance of the coil by its resistance at the resonant frequency. A higher Q factor means lower energy losses and sharper resonance. Q factor can also be expressed as the ratio of stored energy to dissipated energy per cycle.
Construction of Hay’s Bridge
The schematic diagram of Hay’s bridge is shown below:
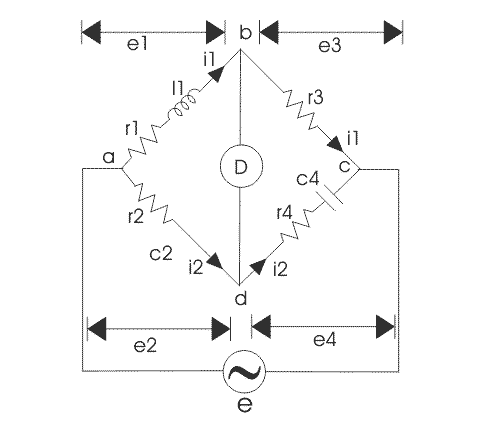
The bridge consists of four arms: AB, BC, CD, and DA. The arm AB contains an unknown inductor L1 in series with a resistor R1. The arm CD contains a standard capacitor C4 in series with a resistor R4. The arms BC and DA contain pure resistors R3 and R2, respectively. A detector or galvanometer is connected between points B and D to indicate the balance condition. An AC source is connected between points A and C to supply the bridge.
Theory of Hay’s Bridge
The balance condition of Hay’s bridge is achieved when the voltage drops across AB and CD are equal and opposite, and the voltage drops across BC and DA are equal and opposite. This means that no current flows through the detector, and its deflection is zero.
Using Kirchhoff’s voltage law, we can write the balance condition as:
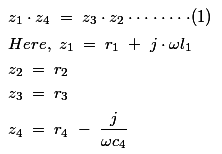
Z1Z4 = Z2Z3
where Z1, Z2, Z3, and Z4 are the impedances of the four arms.
Substituting the values of impedances, we get:
(R1 – jX1)(R4 + jX4) = R2R3
where X1 = 1/ωC1 and X4 = ωL4 are the reactances of the inductor and capacitor, respectively.
Expanding and equating the real and imaginary parts, we get:
R1R4 – X1X4 = R2R3
R1X4 + R4X1 = 0
Solving for L1 and R1, we get:
L1 = R2R3C4/(1 + ω2R42C4^2)
R1 = ω2R2R3R4C42/(1 + ω2R42C4^2)
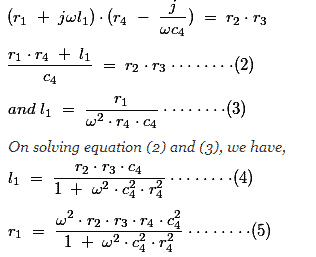
The quality factor of the coil is given by:
Q = ωL1/R1 = 1/ωR4C4
These equations show that L1 and R1 depend on the frequency of the source ω. Therefore, to measure them accurately, we need to know the exact value of ω. However, for high Q factor coils, we can neglect the term 1/ω2R42C4^2 in the denominators and simplify the equations as:

L1 ≈ R2R3C4
R1 ≈ ω2R2R3R4C42
Q ≈ 1/ωR4C4
Phasor Diagram of Hay’s Bridge
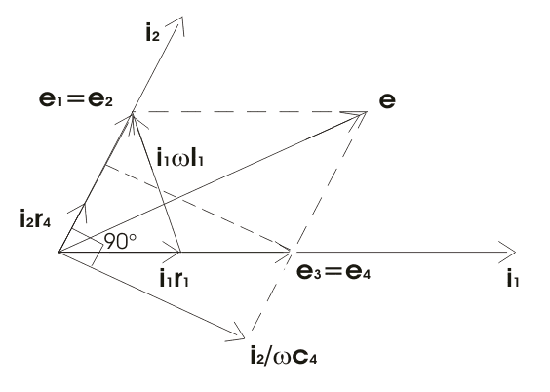
The currents I1 and I2 are not in phase because of the presence of capacitor C4 in arm CD. The current I2 leads I1 by an angle φ, as shown. The voltage drops E1 and E2 are equal in magnitude and phase because they are across pure resistors R1 and R2, respectively. The voltage drops E3, and E4 are also equal in magnitude and phase because they are across pure resistors R3 and R4, respectively. The voltage drop E5 is perpendicular to E4 because it is across capacitor C4. The voltage drop E6 is perpendicular to E1 because it is across inductor L1. The phasor diagram shows that E6 + E5 = E3 + E4 = E.
Advantages of Hay’s Bridge

Hay’s bridge provides simple expressions for calculating unknown inductance and resistance of high Q factor coils.
Hay’s bridge requires a low value of R4 compared to Maxwell’s bridge. This reduces the error due to stray capacitance and leakage resistance.
Hay’s bridge can measure the Q factor over a wide range by varying C4.
Disadvantages of Hay’s Bridge
Hay’s bridge is not suitable for measuring low Q factor coils (Q < 10). For such coils, Maxwell’s bridge or other bridges are preferred.
Hay’s bridge requires a standard capacitor with high accuracy and stability.
Hay’s bridge requires a frequency meter to measure L1 and R1 accurately.
Applications of Hay’s Bridge
Hay’s bridge can be used for various applications, such as:
Measuring self-inductance of coils with high Q factor in laboratories or industries.
Calibrating other bridges or instruments that measure self-inductance or Q factor.
Studying the effects of frequency on self-inductance or Q factor.
Designing filters or oscillators that use high Q factor coils.
Conclusion
Hay’s bridge is a useful method for measuring the self-inductance and resistance of coils with high-quality factors. It is a modification of Maxwell’s bridge that uses a capacitor in series with a resistor in one arm of the bridge.
The balance condition of Hay’s bridge is achieved when the voltage drops across the opposite arms are equal and opposite. The unknown inductance and resistance can be calculated from simple equations that depend on the frequency of the source. Hay’s bridge has some advantages and disadvantages over other bridges and can be used for various applications in electrical engineering.
Statement: Respect the original, good articles worth sharing, if there is infringement please contact delete.