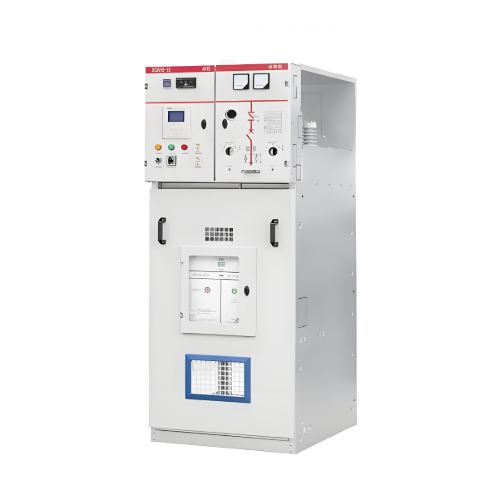
10kV SF₆ Ring Main Units (RMUs) Common Fault Prevention Measures
Ga wata ɗaya na iya cikin haɗin kasa mai sauƙi a ƙasar, 10kV SF₆ Ring Main Units (RMUs) (European-style), da suke mafi girma a matsayin manyan masu tattalin noma, suka samu yawan amfani saboda abubuwa masu kyau kamar harkokin kusa, ƙarfin sauri, ƙarfin zafi, tsakiyar kadan, da kuma karfi na tsarin alaƙo. Amma, idan an yi amfani da RMUs mafi yawa, yadda ake samun nasarorin a cikin RMUs ta shafi daɗi.
1 Abubuwan Nasara A Cikin RMUs
- Nasarorin A Cikin Kyaututtuka Da Busbar: Kyaututtukan busbar na RMU suna amfani da kyaututtuka da ke gano da silicone rubber, kusan kusa da ƙarfi, don ya ba ƙarfin siffar kai da kuma ƙarfin ainihin mutanen ƙasa. Su na iya gano da kyaututtuka da suka so in son. Amma, idan gasar SF₆ ta fitowa, saboda abubuwa daban-daban, zai ƙarɓe ƙarfin kusa da kuma ƙarfin ƙwayar kai na RMU, kuma yana iya samu nasarorin a cikin busbar da kuma ƙarfin kusa.
- Nasarorin A Gargajiya Da RMU Da Cable Na Uku: A lokacin da ake gano cable na uku, ana bukatar ɗaukar takwasu, kuma ana bukatar ɗaukar lafiya daga ƙarshen. Ba ɗaya, bayan ake gano, ƙarshen da aka ɗauka yake ɗauki, wanda yake iya haifar da ƙarshen da ke kan bushings. Wannan yana iya haifar da ƙarshen bushings, kuma yana iya samu nasarorin kai na takwasu.
- Nasarorin A Cikin Tsakirin Cable Na RMU: Tsakar cable na RMU na tsakiyar kadan, wanda yake ƙarfi da ƙarshen tsakirin cable. Idan babu ƙarfi da ƙarshen tsakirin cable, yana iya samu nasarorin kai na cable saboda babu tsari da ƙarshen tsakirin cable.
2 Tushen Kungiyoyi
- Tsara Cables Daban-Daban Da Ke Ji Don RMU:
Cables na uku da ke ji don RMU za su iya tsara da ƙarshen cable clamps tare da ƙarshen high-voltage bushings. Idan ba a yi haka, cable zai ƙarɓe ƙarshen da ke kan bushings. Ƙarshen da ya ɗauki yana iya haifar da ƙarfin sauri a kan bushings da cabinet, kuma yana iya samu nasarorin kai na bushings, ƙarshen bushings, da kuma nasarorin kai na takwasu.
Bayyana ƙarshen vertical symmetry na cable cores bila ƙarshen. Ƙarshen branch glove yana bukatar ƙarshen tsakiyar kadan, kuma ƙarshen cable clamp yana bukatar ƙarshen tsakiyar kadan, da ƙarshen minimum vertical distance of 750mm daga bushing.
A lokacin da ake gano, idan ake jira cable daga ƙarshen foundation na RMU zuwa cable compartment, cut off ƙarshen cable da aka ƙarshen a lokacin da ake jira. Sannan ɗaukar takwasu, sautsa ƙarshen entry angle na cable zuwa RMU don ya fara da uku cores da bushings. Idan ƙarshen entry angle na cable yana ƙarshen, ƙoƙarin cable zuwa cable trench, sautsa ƙarshen, ƙoƙarin jira zuwa RMU, kuma tsara da cable clamp.
- Phase Separation Da Tsakirin Cable:
Idan ake yi phase separation, first secure the lower end of the cable branch glove da ƙarshen cable clamp, sannan then trim ƙarshen cable core lengths.
Bayyana L2 core da L2 bushing. Sauri L1 da L3 cores outward from the root first, sannan bayyana vertically upwards with their bushings. Screw on the double-ended fixing bolt, temporarily hang the cable lug on the bushing, compare the cable length, and saw off any excess core. Ensure the three cable cores are of correct, equal length and flush to avoid stress on the bushings and poor contact between the cable lug and the bushing face.
Failing to secure the cable before trimming the core lengths means there is no reference point, leading to errors. Therefore, securing the cable first is crucial.
Pay attention to the following points during cable stripping:
- Stripping dimensions must strictly follow the specifications provided by the cable T-body connector manufacturer and their accompanying process dimensions.
- Extreme care must be taken when removing outer layers to avoid damaging inner layers.
- Absolutely avoid longitudinal scratches on the core insulation to prevent internal creepage.
- Always use the manufacturer's designated special cleaning wipes; avoid using alternatives like industrial alcohol.
- For installation lubricant, it is recommended to use polyfluoropolyether (PFPE) grease products. These are non-reactive with silicone rubber, ensuring long-term sealing and insulation performance. Avoid using silicone-based greases, as mutual dissolution and drying with silicone rubber can create a risk of interfacial creepage.
- Ensuring Proper Fit Between Stress Cone and Cable Cross-Section:
The interference fit (overlap) must be appropriate. Excessive interference makes installation difficult and risks cracking the components. Insufficient interference compromises sealing and can lead to severe surface discharge.
For cable T-body connectors, the stress cone, insulating outer sheath, and the cable itself have specific relative positioning requirements, offering less flexibility. Installation must be performed strictly according to the requirements (standards vary between manufacturers) to meet stress control and insulation sealing demands.
Furthermore, during installation, ensure the stress cone body is positioned within the vertical section of the cable where possible, to guarantee the best sealing effect. Take special care to prevent sharp objects from scratching the inner or outer surfaces of silicone rubber stress cone components. Apply the designated installation lubricant evenly and separately to the contact surfaces forming the interference fit.
- Installing Elbow Connectors:
The conductor connection within cable elbow connectors is completed inside the insulated outer housing, making the contact condition difficult to observe and inconvenient to test. Therefore, it must be ensured that the lug face is parallel and in flush contact with the conductive face of the RMU bushing. This minimizes the stress exerted by the lug on the bushing while ensuring full, good contact to prevent heating during operation.
The crimping of cable lugs onto wire cores must follow the installation procedure. Pay strict attention to the orientation of the lug face; it should be parallel to the copper face of the busbar bushing to ensure flush contact. When using a crimping tool, hold the dies closed for 10-15 seconds after reaching the full crimp position to allow the metal at the crimp to stabilize plastically. After crimping, use a file to smooth any burrs or sharp edges on the lug surface, then clean both the core insulation and the lug. Slide the cable lug onto the fixing stud, push the cable elbow connector into the bushing, and install it ensuring the lug face is in tight, flush contact with the copper face of the bushing.