Ջեյմսի կողմից, 10 տարվա էլեկտրական iếtվածքների պահպանության փորձ
Ողջույն բոլորին, ես Ջեյմս եմ, և 10 տարի էլեկտրական iếtվածքների սխալների շտկման ոլորտում եմ աշխատում:
Անցած տաս տարիներում ես աշխատել եմ բոլոր չափերի գործադրամասներում, ենթակայաններում և բաշխման սենյակներում, գրավում եմ դիմելով այգիային ձեռնարկների ներկայացումը, աշխատանքային նախագծումը, պահպանությունը և սխալների հայտնաբերումը: Այգիային ձեռնարկները ամենահաճախ հանդիպող էլեկտրական устройствներն են, որոնց մենք օրական աշխատում ենք:
Այսօր իմ նոր ընկերը հարցրեց ինձ.
«Մեզ նոր այգիային ձեռնարկ է ստացվել — ինչպե՞ս են նա ներկայացվում և աշխատանքում սկսվում: Ի՞նչ պետք է ուշադրություն դարձնեմ»:
Սա շատ գործնական հարց է, հատկապես այն ուժեղ այն ուժեղ այն ուժեղ ու հիմնական սկսնակների համար — նա ինչ-որ իմանալու առանց սկսնակ թեմա է: Այսպիսով, ես ամբողջապես պարզ եւ հասկանալի ձևով բոլորը բացատրելու եմ, որպեսզի դուք հասկանաք և աշխատեք հավատալիորեն:
1. Ինչ է այգիային ձեռնարկը?
Սկսենք կարճ ներկայացումով.
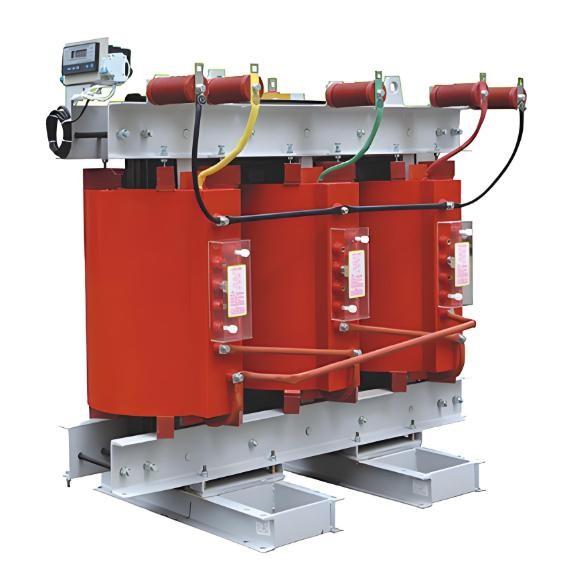
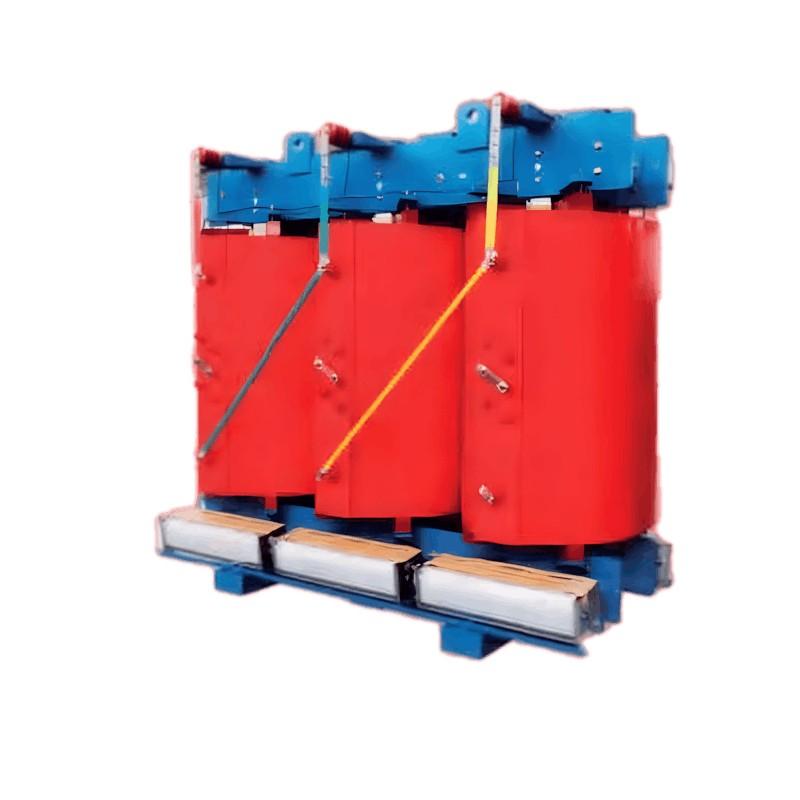
Այգիային ձեռնարկը էպոքսի ռեզինայով պատրաստված առանց յուղի ձեռնարկ է, որը լայնորեն օգտագործվում է գրադարաններում, հիվանդանոցներում, խանութների կենտրոններում, տվյալների կենտրոններում — այն տեղերում, որտեղ հրաշալի անհանգիստությունը կարևոր է:
Հյուսիսային ձեռնարկների հակառակը, այն չի օգտագործում հյուսիս, որը դրան ավելի անվտանգ և տնտեսական դարձնում է: Այն նաև ավելի ạyնական է, հատկապես միջանդին, թափոնի պայմանների և ներկայացման որակի նկատմամբ:
2. Ինչ պետք է նախապատրաստվել ներկայացման առաջ
Ներկայացման առաջ նախապատրաստումն է կարևոր: Ոչ թե կարգավորել առանց նախապատրաստում, կարևոր է հասկանալ հետևյալ կետերը.
1. Ներկայացման ստուգում
Ստուգեք ներկայացման ամբողջականությունը.
Հաստատեք ապարատի վավերական, հրահանգարանը և գործարանի փորձարկման հայտը լրիվ են արդյոք.
Ստուգեք նշանակալու պարամետրերը (ուժ, լարումների հարաբերություն, հեռացման խումբ) համընկնում են նախագծման պահանջների հետ.
Ստուգեք որևէ ֆիզիկական կրնանալ, շարժում կամ ռեզինայի անհարթություն.
Հաստատեք ուղեծիկները, բուսային շարահյուսները, վենտիլյատորները և ջերմաստիճանի կառավարիչները լրիվ են արդյոք.
2. .Environmental Inspection
The installation site should be dry and well-ventilated, avoiding direct sunlight;
No corrosive gases or flammable/explosive materials nearby;
Floor is level and load-bearing capacity meets equipment requirements;
Humidity in the switch room should ideally be below 60% to prevent insulation dampness;
If possible, install dehumidifiers or space heaters.
3. Tools and Documentation
Installation drawings, wiring diagrams, manufacturer technical manuals;
Torque wrench, multimeter, megohmmeter, infrared thermometer;
Ground resistance tester, insulating mat, personal protective equipment;
Lifting tools (e.g., crane, hoist, lifting straps).

3. Key Steps During Installation
Here’s a standard installation process I've refined over the years:
Step 1: Positioning the Transformer
Place the dry-type transformer on its pre-prepared foundation;
Use a level to ensure it's properly aligned;
Tighten mounting bolts and mark them for future inspection of looseness.
Step 2: Primary and Secondary Side Wiring
Connect high and low-voltage cables according to the wiring diagram;
Use a torque wrench to tighten terminals per specifications;
Ensure correct phase sequence to avoid reverse rotation or short circuits during power-up;
Wrap exposed parts with heat-shrink tubing or insulating tape;
Use a multimeter to check continuity after wiring.
Step 3: Grounding System Installation
The transformer enclosure and core must be reliably grounded;
Use copper grounding wire ≥50mm²;
At least two grounding points connected to the main grounding grid;
Test ground resistance ≤4Ω using a ground resistance tester.
Step 4: Temperature Controller and Fan Wiring
Insert temperature probe into designated hole and secure it;
Pay attention to fan motor phase sequence to ensure correct airflow;
Set alarm and trip temperatures (typically 130°C alarm, 150°C trip);
Test fan start/stop function.
Step 5: Cleaning and Covering
Clean internal dust and debris;
Double-check all fasteners are tightened;
Close cabinet door, label with device number, capacity, and purpose.
4. Key Points During Commissioning
Installation isn't the end — proper commissioning and testing are essential to ensure safe and reliable operation.
1. Insulation Resistance Test
Use a 2500V megohmmeter to measure insulation between windings and ground, and phase-to-phase;
Low-voltage side insulation ≥100MΩ, high-voltage side ≥500MΩ;
If value is low, could be due to moisture — dry and retest;
Record R15 and R60 values, calculate absorption ratio (R60/R15 ≥1.3).
2. DC Resistance Test
Measure DC resistance of each winding;
Detect open circuits, shorts, or poor connections;
Three-phase imbalance should not exceed ±2%.
3. Voltage Ratio Test
Verify voltage ratio matches nameplate;
Identify turn-to-turn short circuits or incorrect wiring;
Tolerance within ±0.5%.
4. No-Load Test
Keep low-voltage side open, apply rated voltage on high-voltage side;
Measure no-load current and losses;
Determine if there's core damage or local short circuit.
5. System Integration & Trial Run
Power up temperature controller and fan control system;
Observe normal fan startup/shutdown;
Run under light load for at least 2 hours;
Use infrared thermography to monitor connection temperatures;
Ensure no abnormal heating, noise, or vibration.
5. Common Issues and Solutions
From my field experience, here are some common issues and how to handle them:

6. My Suggestions and Experience Summary
As someone with 10 years of electrical equipment repair experience, I always say:
“Installation is the first step, commissioning is critical, and maintenance ensures reliability.”
Dry-type transformers may look simple, but their performance directly affects the stability and safety of your power system.
So here are my suggestions:
Installation Tips:
Follow manufacturer instructions and technical standards strictly;
Pay attention to details like torque, phase sequence, and grounding;
Better to spend an extra 30 minutes checking than to face emergency repairs later.
Commissioning Tips:
Don’t skip any test steps, especially insulation and ratio tests;
Keep complete records for future analysis;
Closely monitor during trial operation and address issues immediately.
Maintenance Tips:
Regular cleaning, especially around windings and air vents;
Check fans, temperature controllers, and terminal blocks;
Monitor hotspots with infrared thermometers;
Maintain equipment logs and track performance trends.
7. Final Thoughts
Installing and commissioning dry-type transformers may sound technical, but once you understand the basic steps and precautions, it becomes manageable.
Remember this key message:
“Details determine success or failure; safety comes first.”
If you're dealing with similar issues on-site and aren’t sure how to proceed, feel free to reach out — we can work through it together and find the best solution.
May every time you close the breaker bring a smooth “click” — not a sudden “bang!”
— James